Mini Jet Boats (MJBs) are appealing because they promise “real watercraft fun” without the trailer hassles that come with larger boats and many traditional PWCs. But the make-or-break detail for most owners is simple: how do you load the MJB into the back of a ute or a large SUV safely, repeatedly, and without wrecking your back (or your vehicle)?
This guide lays out every sensible loading method that Australians actually use (and that councils, clubs, and practical operators would accept as a sound approach). It also covers what matters just as much as the loading method: load restraint, weight distribution, and manual handling safety.
A quick note on terminology: “MJB” here means a small personal watercraft–style mini jet boat that is light enough in concept to be handled without a trailer in some situations. The exact method you choose depends on your boat weight, hull shape, how wet/sandy it is, your ute/SUV setup, and how often you’ll be doing it.
The Non-Negotiables Before You Even Choose a System
1) Know your real weights and limits
Before you buy ramps or winches, confirm:
- Boat weight (wet): boats gain weight fast with water in hull cavities, sand, gear, fuel/battery, and accessories.
- Payload of the ute or SUV (and any canopy system weight).
- Axle limits and the effect of putting a heavy load behind the rear axle.
Australian guidance consistently emphasises choosing a suitable vehicle and keeping the load stable and within limits.
2) Load restraint is law-and-life, not “optional”
Your load must be restrained so it can’t move in braking, turning, or sudden manoeuvres. The Load Restraint Guide sets out best-practice approaches (tie-down, blocking, containing) and the importance of using correctly rated restraint equipment.
3) Manual handling: protect your back and your fingers
Loading and unloading is exactly the sort of “hazardous manual task” that causes injury—especially twisting, lifting at reach, and handling awkward objects. Use mechanical assistance where you can, and design the task to minimise strain.
Rule of thumb (old-school but correct): if you’ll do it more than occasionally, spend your money on a system that turns it into a controlled, repeatable process—ramps + winch being the classic.
The Main Loading Options (Ranked from Most Practical to Most “Specialty”)
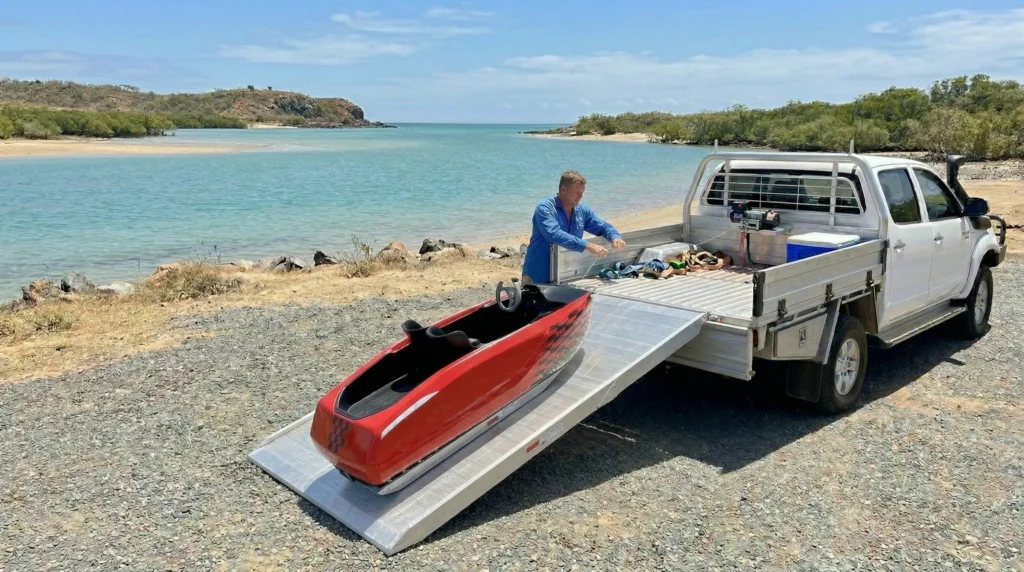
Method 1: Twin ramps + winch (the classic, most repeatable solution)
Best for: regular loading, heavier boats, solo loading
Works with: utes (ideal), some large SUVs (with care)
How it works
- You use two ramps (or one wide ramp) to roll/slide the MJB up into the tray.
- A winch does the pulling so you’re guiding, not muscling.
- Once the bow reaches the tray, you keep winching until the boat is fully seated.
Why it’s excellent
- Minimises manual strain
- Controls the load (less chance of “runaway”)
- Works even when the hull is wet/slippery
- Easy to do alone
What you need
- Quality ramps rated above your total load (including dynamic forces)
- A winch mounted to a strong anchor point in the tray (headboard/bulkhead area)
- A bow attachment point (strap loop or bridle)
- A stable alignment path (guides, bunks, or a skid)
For ramps, Australian suppliers show typical ute ramp setups and the concept of using properly designed ramps rather than improvising.
Practical improvements
- Add guide rails or bunks so the boat self-centres
- Use a snatch block (pulley) to reduce winch load and improve control
- Fit a rubber keel strip / skid pad so the hull doesn’t grind on the tray
Safety notes
- Never stand directly behind the boat while winching up ramps.
- Keep hands clear of pinch points at the tailgate edge.
Method 2: Purpose-built truck/PWC loading ramp systems (skid + integrated winch)
Best for: frequent loading, higher-end setups, people who want a “proper system”
Works with: utes (very good), some SUV hitch/deck setups
There are purpose-built systems designed specifically to pull a PWC up a long aluminium skid with winch assistance—essentially turning loading into a guided “rail” process. The FlexxLoader-style approach is a clear example of the concept: a long skid/ramp designed to work with winch loading.
Why it’s excellent
- The skid acts like a track, reducing side slip
- Consistent loading position every time
- Less chance of hull damage than dragging on bare tray ribs
Considerations
- Cost is higher, but so is repeatability
- You must match the skid width/shape to your hull and chines
Method 3: Ramps + roller/bunk boards (cheap, effective “boat trailer logic” in a tray)
Best for: budget builds, DIYers, frequent loading
Works with: utes (ideal)
This method borrows from trailer design: you create a low-friction path so the boat rolls or slides easily.
Common versions
- Two longitudinal bunks (marine carpeted timber or HDPE strips)
- Roller assemblies or small wheels on a frame (like a miniature trailer)
- A central keel roller path
Why it works
- Reduces friction dramatically
- Helps self-centre the hull
- Protects the tray and the hull
Add a winch and it becomes “near effortless.”
Method 4: Tray slide / bed slide systems (pull the “floor” out to you, then load)
Best for: people with limited reach or back issues, canopy setups, awkward access
Works with: utes and some large SUVs (cargo slides are common in both)
A heavy-duty tray slide brings the load out toward you, so you’re not climbing into the tray to position straps and supports. The SlideMaster example shows a typical slide-out tray concept.
How it helps with an MJB
- You can position the boat onto a slide-out deck more easily
- You can strap it down with better access
- You can integrate rollers/bunks on top of the slide
Important
- Check the slide’s load rating and locking mechanism.
- A slide adds weight and reduces payload—factor that in.
Method 5: “Skid and drag” with low-friction mats (only for very light boats)
Best for: occasional loading, very light hulls, short distances
Works with: utes
This is the old “workboat” method: lay down HDPE sheets, rubber conveyor, or marine skids and pull the hull in with a winch or team lift.
Pros
- Simple and cheap
- Minimal equipment
Cons
- More hull wear
- Higher pulling force
- More risk of uncontrolled movement if you’re not careful
If you choose this, do it properly: winch + controlled alignment + correct tie-down.
Method 6: Tailgate extension + long ramps (reduces angle, improves control)
Best for: higher trays, heavier boats, solo loading
Works with: utes (very good)
A tailgate extension increases your ramp length, reducing the loading angle. The lower the angle, the safer and easier the load. This is especially helpful on lifted 4×4 utes.
Method 7: Hitch-mounted crane/davit + lift/rotate into tray (for awkward loads)
Best for: those who prefer lifting over pulling; workshops; operators with mechanical confidence
Works with: utes and large SUVs with a suitable hitch receiver
A hitch-mounted davit system illustrates the crane concept: it mounts into the hitch receiver and provides a lifting arm for controlled hoisting.
How it can work for an MJB
- Lift the bow (or the whole craft if rated and rigged correctly)
- Swing/guide it into the tray onto bunks or a cradle
Caution
- Lifting introduces new hazards: swing, crush zones, and overload risk.
- You must have a properly rated lifting device and safe rigging practice.
- This method is generally better for modules (battery pack, motor unit) or partial lifts than for lifting an entire craft, unless the craft is genuinely light and the system is engineered for it.
Method 8: A-frame / portable gantry + hoist (the “yard method”)
Best for: home base loading where you want zero strain
Works with: utes and SUVs, but mainly at home/workshop
A portable A-frame gantry with a chain block (or electric hoist) can lift the craft, then you reverse the vehicle under it and lower onto bunks/cradle.
Pros
- Very safe if set up correctly
- Minimal physical effort
- Excellent for older operators or anyone protecting their back
Cons
- Not portable in the “take it to the beach” sense
- Needs space and a stable surface
Method 9: Forklift / loader / workshop lift (commercial operators)
Best for: dealers, warehouses, councils, clubs with plant equipment
Works with: utes and larger vehicles
If you have access to plant equipment, loading becomes a controlled lift onto a prepared cradle. The critical part is still restraint and stability once it’s in the vehicle.
SafeWork guidance around traffic management and keeping people clear during loading/unloading is highly relevant whenever plant equipment is involved.
Method 10: Large SUV internal loading (only for genuinely compact MJBs, and only if designed for it)
Best for: very compact craft, modular designs, or “split load” approaches
Works with: LandCruiser/Patrol-size SUVs, vans, wagons (space dependent)
For SUVs, the smart approach is often modular loading:
- Put the hull in (if it fits)
- Load battery/gear separately (reduces lift weight)
- Use a cargo slide or rollers to avoid wrestling
Critical safety points
- Fit a cargo barrier where appropriate; unsecured loads inside a cabin can be lethal in a sudden stop.
- Protect interior trim with a proper liner.
- Prevent fuel/water contamination (if applicable).
Choosing the Right Method: A Practical Decision Framework
If you’ll load it weekly (or more)
Choose:
- Ramps + winch, plus
- Bunks/rollers, plus
- A simple tie-down routine you can do in minutes
This is the traditional “do it once, do it right” approach.
If you’ll load it occasionally
Choose:
- Good ramps
- A basic winch or come-along
- Low-friction mats or bunks
- No heroics, no improvisation
If you’re protecting your back (or you load alone)
Choose:
- Winch-based systems
- Slide-out decks
- A-frame/gantry at home
- Avoid manual lifting of awkward hulls
SafeWork advice on hazardous manual tasks is directly relevant here—design the job so the load is controlled and the strain is minimised.
Restraining the MJB Properly (Simple, Traditional, Effective)
Use the “three-part” approach the Load Restraint Guide consistently promotes:
- Block the load so it can’t slide
- Tie down with rated straps
- Contain where possible (sides, headboard, cargo barrier, nets)
A practical tie-down pattern that works
- Two straps forward (crossed if possible) to prevent lateral movement
- One or two straps rearward to prevent bounce and tail movement
- A bow stop or chock to stop forward creep under braking
- Protect straps from sharp edges and abrasion
And don’t forget: road authorities emphasise that the load must not affect vehicle stability and the vehicle must be suitable for the load.
A “No Surprises” Loading Checklist (Use Every Time)
Before loading
- Vehicle on level ground, handbrake on
- Ramps locked/secured to the vehicle
- Winch line inspected (no frays, kinks)
- Clear area—no one behind the craft
During loading
- Guide the hull, don’t lift it
- Keep hands off pinch zones
- Winch slowly and steadily
After loading
- Confirm final position against stops/chocks
- Apply tie-downs (rated straps)
- Check strap tension after 5–10 minutes (straps settle)
- Re-check after first short drive